Introduction
With data breaches making headlines almost every day, organizations are increasingly prioritizing data security, especially for sensitive information. In cloud databases like Azure SQL Database, protecting personally identifiable information (PII) and sensitive business data is crucial not only for compliance with regulations like GDPR and HIPAA but also for maintaining customer trust. Dynamic Data Masking (DDM) is a powerful feature in Azure SQL Database that helps limit sensitive data exposure by masking it for non-privileged users. This article takes you through what DDM is, how it works, and how you can use it to make your data more secure.
What is Dynamic Data Masking (DDM)?
Dynamic Data Masking (DDM) is designed to prevent unauthorized users from accessing sensitive data while allowing applications to function as normal. With DDM, organizations can mask data in real time without modifying the actual data stored in the database. This way, people who don’t need to see full data such as support or development teams can still interact with the database without viewing the actual values of sensitive data fields.
Think of DDM as a layer of protection that sits on top of the database, dynamically obfuscating data when accessed by certain users. It’s especially useful in scenarios where multiple teams need database access but don’t require exposure to all the data.
How Does Dynamic Data Masking Work in Azure SQL Database?
DDM works by applying masking rules on specific fields within database tables. The beauty of DDM is that it’s applied in real time when data is retrieved, so the underlying data remains intact. When a non-privileged user queries a masked field, Azure SQL returns a masked version based on predefined rules, but privileged users (like admins) can still access the full data.
This flexibility makes DDM a great fit for controlling data visibility, particularly for PII like Social Security numbers, credit card numbers, or email addresses. Let’s break down the types of masks DDM offers.
Types of Masks Available in DDM
Azure SQL Database provides four primary masking options to accommodate different types of data:
- Default Mask: This is a basic mask that replaces data with a string of asterisks (or zeroes for numeric data). For instance, when masked, text fields may display “XXXX” and numeric fields will show “0.” It’s a quick and easy way to mask basic data types without needing a custom configuration.
- Credit Card Mask: Specifically tailored for credit card information, this mask shows only the last four digits (e.g., XXXX-XXXX-XXXX-1234). This mask format is widely accepted, as it provides enough information to identify specific cards without exposing full details.
- Email Mask: Designed for email addresses, this mask displays the first letter of an email, followed by a mask, then the domain (e.g., [email protected]). It’s useful when the domain information is relevant for data processing but the full email address isn’t needed.
Custom Mask: If you need flexibility, custom masks allow you to define a specific format. For example, you could mask a phone number to show “(XXX) XXX-1234” to maintain readability without revealing the full number.
These mask types make it easy to control visibility based on the data you’re working with, helping you comply with privacy standards without losing essential functionality.
Setting Up Dynamic Data Masking in Azure SQL Database
Enabling DDM is simple and intuitive in the Azure portal. Here’s how you can set it up:
- Access the Database: Go to your Azure SQL Database in the Azure portal.
- Navigate to Dynamic Data Masking: Under the database’s security settings, you’ll find Dynamic Data Masking. Click to open the DDM configuration page.
- Configure Masking Rules: Azure will recommend columns to mask, usually those with sensitive data like email, credit card, or Social Security numbers. You can apply masks to these or add custom columns based on your needs.
- Choose Masking Type: For each column, select the appropriate mask type (default, credit card, email, or custom).
- Save and Apply: Once your configuration is complete, save the settings. From this point on, any non-privileged user querying masked fields will see the masked data format instead of the original values.
This process is non-intrusive, and the masked fields will automatically apply to users based on their roles.
Use Cases and Benefits of DDM
Dynamic Data Masking offers a range of benefits, particularly when working with sensitive data in multi-user environments. Here are a few of the key use cases and advantages:
- Development and Testing: Developers and testers often need real-world data to simulate production environments, but exposing sensitive data in test environments can be risky. With DDM, these teams get masked data, reducing exposure risks.
- Compliance and Security: DDM can assist with compliance by limiting who can view sensitive data, helping meet regulations that restrict access based on role.
- Low Performance Impact: DDM is applied at the database layer and doesn’t require schema modifications or complex configurations, meaning there’s minimal impact on performance.
Flexible Management: DDM settings are easy to adjust in the Azure portal, allowing you to add, modify, or remove masks as needed.
Security Best Practices with DDM
Dynamic Data Masking is effective, but it’s best used as part of a layered security strategy. Here are a few ways to maximize its impact:
- Use Role-Based Access Control (RBAC): Assign roles so only necessary personnel see unmasked data. By configuring role-based permissions, you can better control who accesses what.
- Combine with Other Security Features: Use DDM alongside Always Encrypted for data protection, Row-Level Security to restrict access based on user roles, and Transparent Data Encryption (TDE) to secure data at rest.
- Monitor and Audit: Regularly check logs to monitor who’s accessing sensitive data. Azure’s auditing features can help you track and review access patterns, ensuring compliance and spotting anomalies.
When used with these additional security controls, DDM can significantly reduce data exposure risks in Azure SQL Database.
Limitations of Dynamic Data Masking
While DDM is a helpful feature, it’s important to understand its limits:
- DDM is Not Encryption: DDM only masks data when displayed to certain users; it doesn’t encrypt it. For high-security requirements, encryption should be used alongside DDM.
- Not Foolproof Against All Users: DDM reduces data exposure, but highly determined users with technical skills might infer masked data. For extremely sensitive data, combining DDM with strict access controls and monitoring is essential.
Demo Steps for Dynamic Data Masking in Azure SQL Database
Step 1: Set Up an Azure SQL Database
- Create an Azure SQL Database:
- In the Azure Portal, search for Azure SQL Database and select + Create.
- Choose your Subscription and Resource Group.
- Name your database (e.g.,
DDM_DemoDB) and select a Server. If you don’t have a server, create one by specifying an admin username and password.
- Create a Sample Table:
- Connect to your SQL database using Azure Data Studio or SQL Server Management Studio (SSMS).
- Open a new query window and create a sample table with sensitive data.
CREATE TABLE Customers (
    CustomerID INT PRIMARY KEY,
    FullName NVARCHAR(100),
    Email NVARCHAR(100),
    CreditCardNumber NVARCHAR(16),
    SSN NVARCHAR(11)
);

INSERT INTO Customers (CustomerID, FullName, Email, CreditCardNumber, SSN)
VALUES
    (1, 'Alice Brown', '[email protected]', '1234567812345678', '123-45-6789'),
    (2, 'Bob Nice', '[email protected]', '2345678923456789', '987-65-4321');
This table has columns (e.g.,email, CreditCardNumber and SSN) that we’ll mask in the next steps.
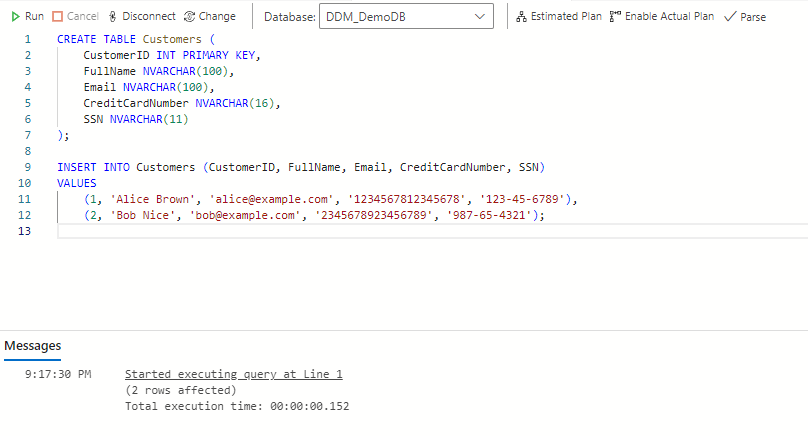
Step 2: Configure Dynamic Data Masking
- Navigate to Dynamic Data Masking:
- In the Azure Portal, go to your SQL Database resource.
- Under Security, select Dynamic Data Masking.
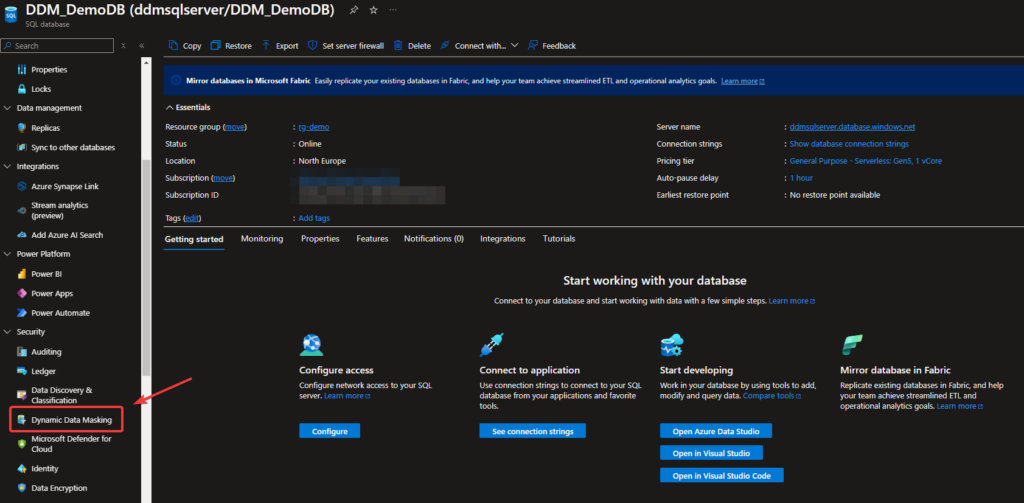
Add Masking Rules:
- Azure SQL may suggest columns to mask automatically. To manually mask columns:
- Click + Add Mask to select a column, choose a mask type, and apply it.
- For this demo, we will apply masks to the
Email,CreditCardNumber, andSSNcolumns. - Select the masking type for each column:
- Email: Use the Email Mask.
- CreditCardNumber: Use the Credit Card Mask.
- SSN: Use a Custom Mask to display just the last four digits (e.g.,
XXX-XX-6789).
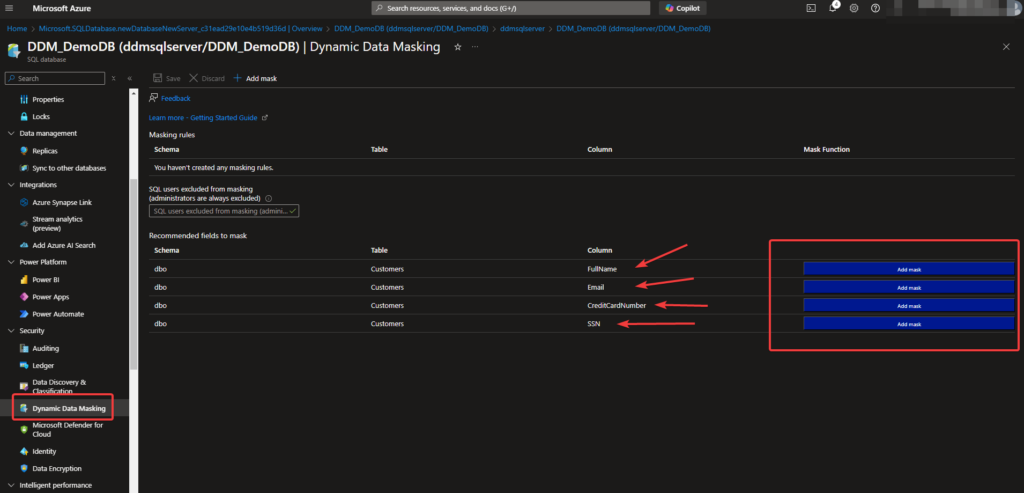

Save Changes:
- Click Save to apply the masking rules. The mask will now be enforced for non-privileged users accessing the database.
Step 3: Create User Accounts for Testing
- Create a Non-Privileged User:
- In your query editor, create a login and user that will only see masked data:
CREATE LOGIN LimitedUser WITH PASSWORD = 'StrongP@ssw0rd';
CREATE USER LimitedUser FOR LOGIN LimitedUser;
GRANT SELECT ON Customers TO LimitedUser;
Create an Admin User:
- Admin users, like the SQL Database admin, have full access to unmasked data by default. If you want to test this as another user, you can create a separate admin:
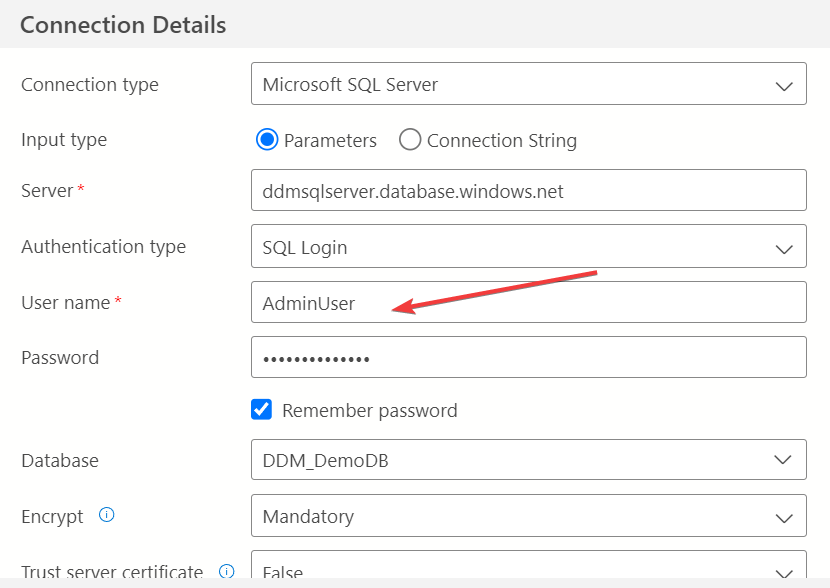
CREATE LOGIN AdminUser WITH PASSWORD = 'StrongP@ssw0rd!';
CREATE USER AdminUser FOR LOGIN AdminUser;
ALTER ROLE db_owner ADD MEMBER AdminUser;
Step 4: Test Dynamic Data Masking
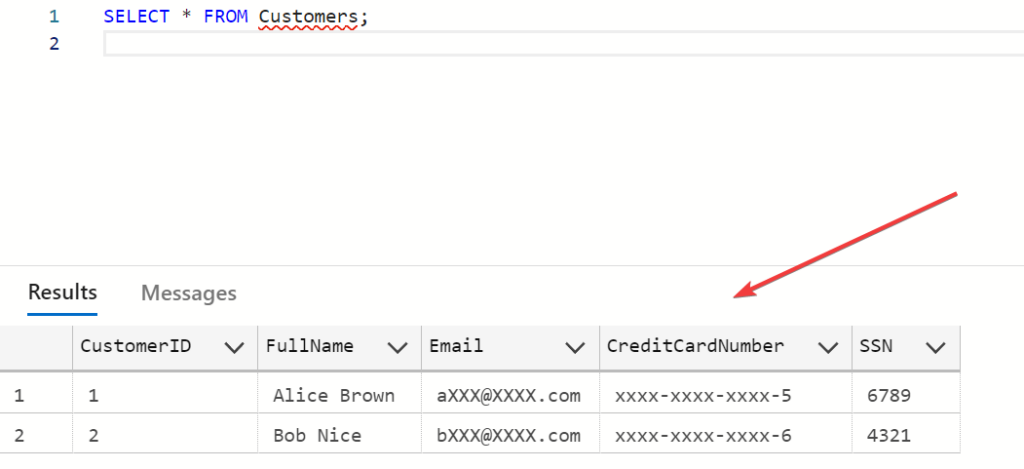
- Query as LimitedUser:
- Disconnect from your query editor and reconnect using the
LimitedUsercredentials. - Run a
SELECTquery to view theCustomerstable:
- Disconnect from your query editor and reconnect using the
SELECT * FROM Customers;- Observe that sensitive data is masked according to the rules you set:
Emailshould display as[email protected].CreditCardNumbershould display asXXXX-XXXX-XXXX-XXX8.SSNshould display in the custom format (e.g.,6789).
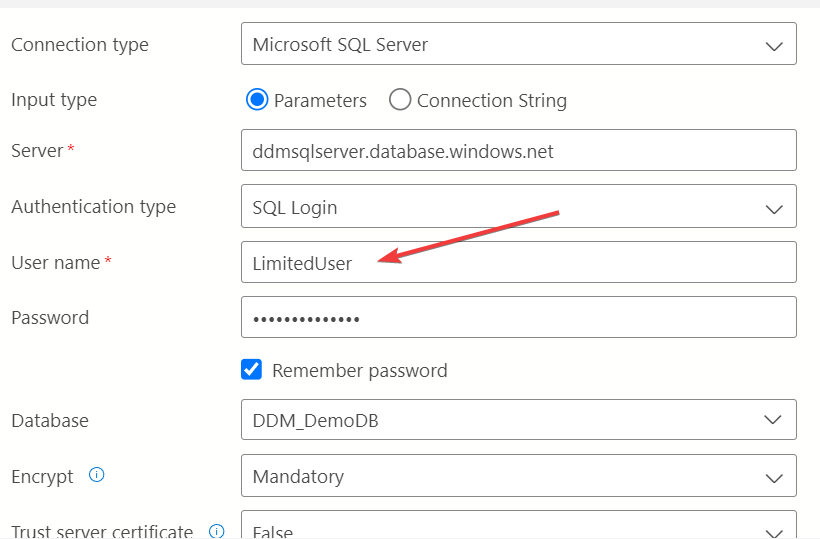
Query as Admin:
- Disconnect and reconnect as the admin user or with the default SQL Database admin credentials.
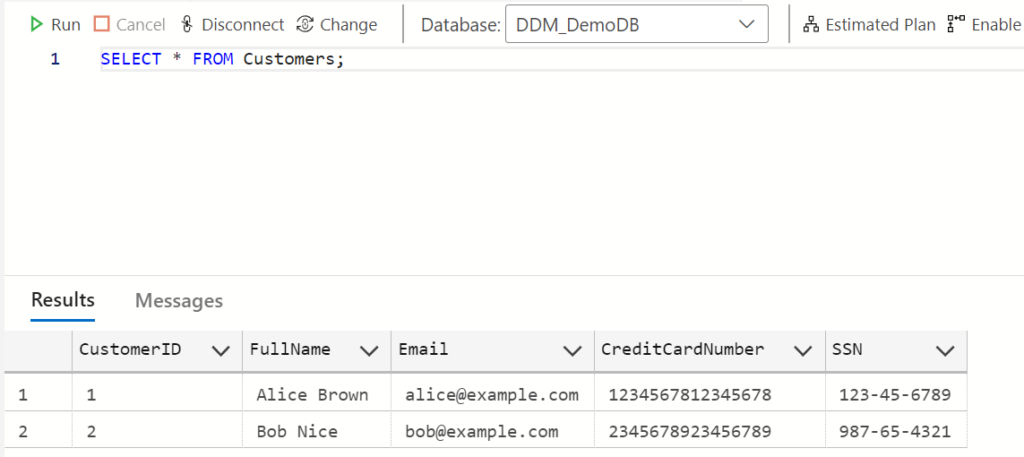
- Run the same
SELECTquery: - Since admin users can bypass masking, you should see the actual values in
Email,CreditCardNumber, andSSN.
Conclusion
Dynamic Data Masking in Azure SQL Database is a valuable feature for protecting sensitive data while still providing access for operational needs. As a part of a broader security strategy, DDM can reduce data exposure risks, aid in compliance, and make sensitive data less accessible to non-privileged users. By combining DDM with other Azure security features, organizations can better protect their data and strengthen their security posture.
With data protection becoming more important than ever, DDM is a practical and easy-to-implement feature that can help your organization safeguard sensitive information without overhauling existing applications. Start exploring DDM today to take a proactive step toward data security.

